
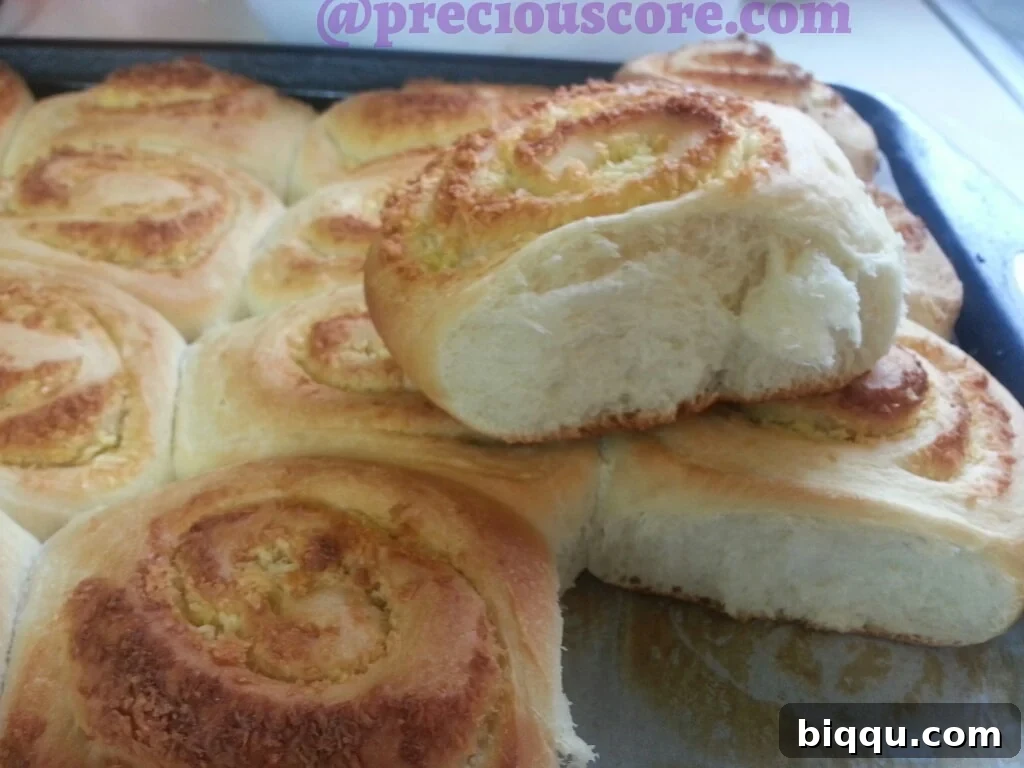
Ultimate Fluffy Coconut Rolls Recipe: Your Guide to Irresistible Homemade Delights
For those who cherish the exquisite flavor of coconut, you’re in for a treat! If you’ve followed this blog, you’ll know my profound adoration for coconut in culinary creations. This passion has inspired numerous recipes, including my delightful Cameroon-style pancakes with a coconuty twist, and my incredibly popular fried coconut rice – each a testament to my slight obsession with all things coconut. Today, we’re diving into a new adventure that promises to elevate your appreciation for this tropical gem: homemade coconut rolls.
The concept of these heavenly Coconut Rolls arrived as a true revelation, a moment of culinary inspiration that simply had to be brought to life. With every essential ingredient already gracing my kitchen, I wasted no time transforming this divine idea into a tangible, delicious reality. The outcome? A batch of impossibly fluffy, richly flavorful baked rolls that have captured my heart. Prepare to fall in love with these delightful, tender treats!
Don’t Be Intimidated: Crafting Your Own Fluffy Coconut Rolls Is Easier Than You Think!
While these beautiful rolls might appear complex, rest assured, they are surprisingly simple to master. The process does involve some waiting time for the dough to rise, but every moment invested is undeniably worth it, yielding an unparalleled taste and texture that store-bought versions simply can’t replicate. Whether you’re in a tropical paradise or a bustling city, as long as you have access to coconuts or coconut-derived products like coconut milk, coconut oil, desiccated coconut, or even coconut essence, you possess the power to create these incredible rolls. I’ll even guide you on how to prepare them using just a single whole coconut!
In this particular recipe, I’ve incorporated several coconut-infused ingredients to maximize that beloved flavor profile: a creamy coconut spread (which can often be found in the “limited supply” section of grocery stores; for those in the United States, Aldi can be a great place to check for such specialty items), rich powdered coconut milk, finely milled coconut powder, and a hint of potent coconut essence. These elements work in harmony to infuse every bite with an authentic, deep coconut flavor that’s simply irresistible.
However, don’t despair if you don’t have all these specialized ingredients. As I mentioned, even with just one fresh coconut, you are exceptionally well-equipped to embark on this culinary journey. Be sure to check the “Notes” section at the end of this recipe to discover how to transform a single whole coconut into the rich milk and flavorful shredded coconut needed for both the dough and the luscious filling. It’s a testament to the versatility of this incredible fruit!
The foundational dough for these coconut rolls shares a remarkable resemblance to the one I use in my popular Cameroon Gateau recipe. This versatile dough is known for its forgiving nature and ability to produce consistently soft and airy baked goods. For the truly star of the show – the filling – I’ve created a mouth-watering mixture of finely desiccated (dry) coconut, silky confectioner’s (icing) sugar, and just enough eggs to bind it into a moist, finger-licking blend. Just imagine biting into that sweet, tropical explosion!
Let’s Go On a Coconuty Adventure: Homemade Coconut Rolls Recipe
Embark on this delightful baking journey and create incredibly soft, sweet, and aromatic coconut rolls that will transport your taste buds to a tropical paradise. This detailed recipe guides you through every step, ensuring a perfect result every time.
COCONUT ROLLS RECIPE
Prep time: 90 mins (includes rising time)
Cook time: 20 mins
Total time: 1 hr 50 mins
Yields: Approximately 20 delicious rolls
You’ll need these fresh ingredients:
For the fluffy dough:
3 1/2 cups all-purpose flour
5 tablespoons unsalted butter, softened (Alternatively, use a creamy coconut spread for an extra burst of coconut flavor)
1/2 cup coconut milk (full-fat for richness)
2 1/4 teaspoons active dry yeast (or 1 standard sachet)
1/2 cup warm water (ideally between 105-115°F or 40-46°C)
3/4 cup granulated sugar
1 large egg, at room temperature
1 teaspoon salt
For the irresistible coconut filling:
1 cup finely desiccated coconut, coconut powder, or unsweetened coconut flakes
1/4 cup icing (powdered or confectioners) sugar (Adjust or reduce if using sweetened coconut flakes)
2 large eggs, lightly beaten
You’ll also need 1 tablespoon of melted unsalted butter for brushing the rolls before baking, which gives them that beautiful golden sheen.
Here is what you need to do to create these tropical delights:
Preparing the Dough: The Foundation of Fluffiness
Step 1: Activate the Yeast. In a small bowl, combine the warm water with the yeast and a pinch of sugar (taken from the 3/4 cup measurement). Stir gently and let it sit for 5-10 minutes until a foamy layer appears on the surface. This indicates your yeast is active and ready to work its magic. If no foam forms, your yeast might be old, or the water temperature was incorrect, and you’ll need to start with fresh yeast.
Step 2: Melt the Butter/Spread. Gently melt your butter or coconut spread over medium heat until it becomes a clear liquid. Be careful not to brown it. Alternatively, use a microwave for quick melting. Set it aside to cool slightly, as hot butter can deactivate the yeast.
Step 3: Prepare the Coconut Milk. If using powdered coconut milk, mix it with half a cup of warm water until fully dissolved and smooth. Ensure there are no lumps.
Step 4: Combine Wet Ingredients. In a large mixing bowl, add the remaining sugar, salt, the large egg, and the prepared coconut milk to the activated yeast mixture. Whisk everything together until well combined and smooth. Ensure the melted butter has cooled sufficiently before adding it to this mixture to prevent killing the yeast.
Step 5: Incorporate Flour. Gradually add about half of the all-purpose flour to the liquid mixture. Mix thoroughly with a whisk or wooden spoon until a thick, shaggy paste forms. This initial mixing helps develop gluten without overworking it too early.
This should result in a thick paste, almost like a very loose batter, as seen here:
Step 6: Kneading the Dough. Now it’s time to get your hands a little messy! Set aside your whisk. Pour in the remaining flour and begin to mix and knead the dough directly with your hands. Continue kneading on a lightly floured surface for about 8-10 minutes, or until the dough is smooth, elastic, and no longer sticky. It should spring back when lightly poked.
Step 7: Add Coconut Essence (Optional). At this point, you can drizzle some coconut essence over the dough as you knead. This step is entirely optional but will enhance the coconut aroma and flavor. You can often find coconut essence in the baking aisle of larger grocery stores or specialty Asian food markets.
Here’s how the beautifully combined dough should look:
Step 8: First Rise. Place the dough in a lightly oiled bowl, turning it once to coat. Cover the bowl tightly with plastic wrap to prevent a skin from forming. Let it rise in a warm place for one whole hour, or until it has doubled in size. A great tip for a warm environment: lightly warm your oven for 2 minutes on the lowest setting, then turn it off and place your covered dough inside. This creates a perfect proofing chamber.
For an extra layer of warmth and insulation, I often add a clean kitchen cloth over the plastic wrap. This helps maintain a consistent temperature, especially in cooler kitchens, ensuring a successful rise.
Crafting the Irresistible Coconut Filling
Step 9: Prepare the Filling. While your dough is happily rising, begin preparing the flavorful filling. In a medium bowl, combine your choice of powdered coconut, desiccated coconut, or coconut flakes. Add the two lightly beaten eggs. (Note: The original recipe used one egg, but I recommend two for a richer, moister filling that binds beautifully).
Step 10: Add Icing Sugar. Next, add the confectioner’s (icing) sugar to the coconut and egg mixture. If you are using sweetened coconut flakes, you might want to reduce the amount of icing sugar to prevent the filling from becoming overly sweet.
Step 11: Mix the Filling. Mix all the filling ingredients together thoroughly until a cohesive, slightly moist mixture forms. The natural oils from the coconut and the eggs will create a wonderful, pliable texture. Notice the lovely yellow hue the eggs impart!
Shaping and Baking Your Homemade Coconut Rolls
Step 12: Check on the Dough. After one hour, your “baby” dough should have undergone a remarkable transformation, becoming a robust, fully risen “adult” dough, beautifully doubled in size.
Just look at that impressive rise – a testament to active yeast and a warm environment!
Step 13: Prepare Work Surface. Lightly flour your clean working surface to prevent the dough from sticking. This will make rolling much easier.
Step 14: Punch Down and Roll Out. Gently punch down the risen dough to release any excess air. Then, transfer it to your floured work surface. First, gently press and shape the dough with your hands into a rough rectangle. Then, use a rolling pin to roll it into a large, even rectangle, approximately 1/4 inch thick. Aim for a shape that allows for easy rolling, often a wider rectangle rather than a perfect square.
Step 15: Spread the Filling. Generously spread your luscious coconut filling evenly over the entire surface of the rolled-out dough, leaving a small border (about half an inch) along one of the longer edges. This border will help seal the roll later.
Step 16: Roll Up the Dough. Starting from the long edge opposite the unfilled border, carefully and tightly roll the dough into a log. Aim for an even, snug roll to ensure beautiful spirals in your finished buns.
Step 17: Seal the Edge. Once you reach the end, moisten the reserved unfilled edge with a little water using your finger. Press firmly to seal the seam completely. This prevents the rolls from unraveling during baking.
Finish up the rolling and ensure it’s a tight, even log.
Step 18: Trim and Cut. Trim off any uneven edges from both ends of the dough log to ensure all your rolls are uniform and visually appealing. Then, place a sharp knife directly in the middle of the log and cut it in half.
Step 19: Slice into Rolls. Take each half and slice it into eight equal pieces. A neat trick for this is to keep dividing each piece in half until you achieve 8 pieces from each half, resulting in a total of 16 beautifully uniform rolls. You can aim for slightly more or less depending on your desired roll size, typically about 1 to 1.5 inches thick.
Step 20: Arrange for Second Rise. Place the cut rolls on a baking tray lined with parchment paper, ensuring there is enough space between each roll for them to expand during their second rise. You may need two baking trays depending on their size.
Here are your 16 pieces of “coconuty” goodness, ready for their final transformation. Cover them lightly with plastic wrap or a clean kitchen towel and let them sit in a warm place again for about 10-15 minutes, allowing them to plump up slightly for their final rise.
Step 21: Prepare Butter Brush. While the rolls are completing their second rise, melt one tablespoon of butter. If your microwave is unreliable, a simple bain-marie method works perfectly: place a small bowl with butter over a larger bowl of hot water, allowing the steam to gently melt the butter.
Step 22: Preheat Oven & Brush Rolls. Preheat your oven to 325°F (160°C). Once the rolls have visibly expanded after their second rise, gently brush the tops of each roll with the melted butter. This helps achieve a beautiful golden crust and adds a lovely richness.
Step 23: Bake to Perfection. Bake the rolls in the preheated oven for approximately 20 minutes, or until their tops are beautifully golden brown and the rolls are cooked through. Baking times can vary, so keep an eye on them towards the end. The aroma alone will tell you they’re almost ready!
Chef’s Notes & Pro-Tips for Using a Whole Coconut
Using a Whole Coconut: If you’re a true coconut enthusiast and prefer to use a fresh, whole coconut, here’s how to maximize its potential for this recipe:
- For Coconut Milk: Grate the fresh coconut meat. Then, follow a method similar to my coconut rice recipe for extracting fresh coconut milk. For these rolls, use less water during extraction to yield a thicker, richer coconut milk, perfect for the dough.
- For Shredded Coconut Filling: After extracting the milk, you’ll be left with moist, shredded coconut pulp. To prepare it for the filling, gently dry this shredded coconut. You can do this by spreading it thinly in a cooking pan over very low heat, stirring frequently until it’s dry and slightly toasty, but not burnt. Alternatively, spread it on a baking sheet and dry it in a very low oven (around 200°F or 95°C) for 15-30 minutes, stirring occasionally. Once dried, it’s ready to be used as your delicious filling! Easy breezy!
Enjoying Your Homemade Coconut Rolls
These fluffy coconut rolls are best enjoyed warm, fresh from the oven, perhaps with a cup of coffee or tea for a perfect breakfast or an afternoon treat. Their soft texture and sweet, aromatic filling make them an irresistible indulgence. Any leftover rolls can be stored in an airtight container at room temperature for 2-3 days, or refrigerated for up to a week. To revive their freshness, simply warm them slightly in the microwave or a toaster oven.
Conclusion: Embrace the Joy of Baking
There’s nothing quite like the satisfaction of baking something so delicious from scratch, especially when it’s infused with the delightful flavor of coconut. These homemade coconut rolls are more than just a recipe; they’re an experience – from the joyful kneading of the dough to the intoxicating aroma that fills your kitchen as they bake. They prove that making something truly special doesn’t have to be overly complicated. So, gather your ingredients, follow these steps, and prepare to impress yourself and your loved ones with these utterly irresistible, fluffy, and flavorful coconut rolls. Happy baking!