

Ultimate Guide to Making Crunchy & Sweet Chin Chin: An Authentic African Snack Recipe
Have you ever paused to consider the ingenious mind behind Chin Chin? Seriously, who first conceived this delightful snack that has captured hearts across the globe? I believe they deserve significant recognition for creating such an enduring and universally loved treat. As showcased in the vibrant images above, Chin Chin traditionally graces our tables in two primary shapes: neat squares and elegant, slender rectangles, each offering its own delightful crunch.
The Irresistible Allure of Chin Chin: A Snack for Every Occasion
Chin Chin holds a unique power to captivate. It’s one of those treats where you literally have to exercise immense self-control to avoid devouring an entire batch in one go – a delightful challenge I face constantly! Its satisfying crunch and subtly sweet flavor profile make it an instant hit and a treasured snack in countless homes, not just in West Africa but worldwide.
I’ve personally witnessed the magical appeal of Chin Chin when shared as a gift. Offering a batch to friends from various cultural backgrounds almost invariably results in immediate appreciation and often, an enthusiastic request for the recipe! Its simple, comforting taste transcends cultural barriers, proving its universal charm as a beloved snack for anyone who tries it.
This wonderful treat is a true pantry essential in my household. It proves incredibly handy for those spontaneous visits from guests, offering a quick, impressive, and utterly delicious snack option with minimal effort. Beyond impromptu entertaining, it’s my absolute favorite companion for movie nights, providing that perfect, satisfying crunch that keeps my hands and mouth busy. While I can’t definitively vouch for it being a healthier alternative to traditional popcorn, it unquestionably offers a fantastic and flavorful substitute for your cinematic indulgence.
Unlocking the Perfect Chin Chin: Key Ingredients and Desired Texture
At its core, Chin Chin is an elegant yet straightforward fried dough snack. Much like other cherished flour-based delights from the region, such as Fish Rolls, Gateau, Milk Bread, Coconut Pancakes, and Puff-puff, high-quality all-purpose flour forms the indispensable foundation. This humble ingredient undergoes a delightful transformation, combined with margarine (or vegetable oil for a slightly different texture), sugar, eggs, a leavening agent, and a hint of aromatic spice to produce these beloved crunchies.
The defining characteristic of truly exceptional Chin Chin lies in its texture: it must be wonderfully crunchy and crispy, yet never hard or brittle. Achieving this delicate balance is paramount to its widespread appeal and is the ultimate goal of this recipe. The harmonious blend of subtle sweetness and satisfying crispness ensures that each piece is an absolute delight, leaving you craving more.
Enough with the preamble about its deliciousness – let’s roll up our sleeves, head into the kitchen, and bring this incredible snack to life!
Authentic Cameroon Chin Chin Recipe: Your Step-by-Step Guide
This comprehensive recipe will meticulously guide you through every stage of creating perfect Chin Chin, echoing the traditional flavors and textures found in Cameroon. Prepare to delight your family and friends with this irresistible homemade treat that’s sure to become a cherished favorite.
Recipe Overview:
- Prep time: Approximately 40 minutes (includes mixing and rolling)
- Cook time: Approximately 30 minutes (frying in batches)
- Total time: Approximately 70 minutes
- Serves: 4-6 people (yields a generous bowl, perfect for sharing)
Essential Ingredients You’ll Need:
- 4 cups (approximately 500 grams or 1/2 Kg) all-purpose flour
- 6 level tablespoons unsalted margarine (ensure it’s softened, or use 1 cup liquid vegetable oil for a slightly crispier and lighter final product)
- 8 tablespoons granulated sugar (feel free to adjust to your personal sweetness preference; a tablespoon or two more can be added)
- 1 teaspoon baking powder (a leavening agent for a tender crumb)
- 2 large eggs
- 1/4 teaspoon fine sea salt (enhances overall flavor)
- 1 small can (typically around 5 oz or 150ml) evaporated milk (brands like Peak are popular, but any good quality evaporated milk will work)
- 1/2 teaspoon freshly grated nutmeg (crucial for that distinctive, authentic aroma and flavor)
- 1 litre (approximately 4 cups) vegetable oil for deep frying (ensure it’s a neutral oil with a high smoke point, such as canola, sunflower, or corn oil)
Detailed Step-by-Step Method:
1. Preparing the Dry Ingredients: The Foundation of Flavor
Begin by combining the all-purpose flour, baking powder, salt, and freshly grated nutmeg in a large mixing bowl. Use a whisk to thoroughly blend these dry ingredients, ensuring they are evenly distributed throughout the mixture. This prevents pockets of unmixed ingredients and contributes to an even texture.
Next, add the softened margarine to the dry mixture. Using your fingertips, gently “rub in” the margarine until the mixture transforms into a texture resembling coarse breadcrumbs. This technique is vital for incorporating fat into the flour, resulting in a tender and flaky Chin Chin. If you opt for vegetable oil, simply pour it into the dry ingredients and mix well until the flour is thoroughly coated and resembles a wet sand consistency.
2. Combining the Wet Ingredients: The Liquid Gold
In a separate, medium-sized bowl, crack the two large eggs. Using a fork or an egg whisk, beat the eggs vigorously until they are well combined, slightly frothy, and pale yellow. This aeration process introduces air into the mixture, which can contribute to a lighter Chin Chin.
Now, pour the evaporated milk and add the granulated sugar into the beaten eggs. Whisk everything together until the sugar is largely dissolved. This sweet and rich liquid mixture is what will bring our dough to life, infusing it with flavor and essential moisture.
3. Forming the Dough: Achieving the Perfect Consistency
Gradually pour the combined wet mixture (eggs, milk, sugar) into the bowl containing the dry ingredients. Mix everything thoroughly, using either a sturdy wooden spoon or your clean hands, until a cohesive dough begins to form. The dough should come together, pulling away from the sides of the bowl. It should be pliable and not excessively sticky. If the dough feels too dry or crumbly and struggles to come together, add a very small amount of water – no more than one tablespoon at a time – and continue mixing until it forms a nice, elastic dough that is smooth and easy to handle. If your dough forms a perfect consistency, like the one pictured below, without the need for additional water, then you’ve hit the sweet spot!
4. Rolling and Cutting the Dough: Crafting Your Chin Chin Shapes
Lightly flour a clean, dry work surface or a large chopping board. Take approximately a quarter of the prepared dough (to make it more manageable) and place it on the floured surface. Using a rolling pin, roll out the dough evenly. Aim for a thickness of about 1/8 to 1/4 inch (approximately 3-6mm). Remember, thinner dough will result in crispier Chin Chin, while a slightly thicker dough will yield a chewier texture. Choose according to your preference!
Once rolled, unleash your creativity! Use a sharp knife, a pizza cutter, or a pastry wheel to cut the dough into your desired shapes. The most popular and traditional shapes are small squares and slender rectangles. Feel free to experiment with other fun shapes too, especially if you’re making them for children! The images below vividly demonstrate these common cutting techniques.
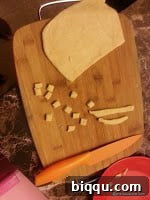
As you cut the Chin Chin pieces, gently transfer them to a separate floured tray or a sheet of parchment paper. This prevents them from sticking together while you continue cutting the remaining dough and prepare for the frying stage.
5. Frying to Golden Perfection: The Culinary Climax
Pour the 1 litre of vegetable oil into a large, deep pot or a deep fryer. Heat the oil over medium heat. To accurately test if the oil is at the optimal temperature, drop a tiny piece of excess dough into it. If it immediately sizzles, bubbles, and floats to the surface, your oil is ready (ideally around 350-375°F or 175-190°C). If it sinks and no bubbles appear, the oil is too cool. If it browns instantly, it’s too hot.
Now, carefully add the Chin Chin pieces to the hot oil in SMALL batches. This is an absolutely critical step for achieving that desired crispness! Overcrowding the pan will dramatically lower the oil’s temperature, causing the Chin Chins to absorb an excessive amount of oil. This results in a greasy, soggy, and overall undesirable texture. Fry just enough pieces so they can move freely and are not touching each other too much in the oil.
Fry each batch for approximately 3-5 minutes, or until the Chin Chin pieces achieve a beautiful, uniform golden brown color. Stir them occasionally with a slotted spoon to ensure even cooking and browning on all sides. As they cook, you’ll notice them becoming wonderfully crisp and developing their signature crunch.
6. Draining and Cooling: Preserving the Crispness
Once the Chin Chin is perfectly golden brown and has reached its desired crispness, carefully remove it from the hot oil using a slotted spoon or a spider strainer. Gently transfer the freshly fried pieces to a large plate or tray generously lined with several layers of paper towels. This crucial step allows any excess oil to drain away, which is vital for maintaining their crispness and preventing them from becoming greasy. Change the paper towels if they become saturated.
Expert Tips for Chin Chin Perfection and Variations
Achieving the Ultimate Crunch and Flavor:
- The Importance of Cooling: This step cannot be stressed enough! Always allow your Chin Chin to cool completely, preferably on a wire rack or the paper towel-lined tray, before storing or serving. Proper cooling allows them to crisp up further and prevents any trapped moisture from making them soggy. Packaging them while still warm will lead to a soft, less desirable texture.
- Elevate the Flavor Profile: For an extra layer of delightful aroma and a hint of zing, consider grating the zest of half an orange or a whole lime directly into your dry ingredients. The vibrant citrus notes beautifully complement the nutmeg and sweetness. You can also experiment with a small pinch of ground cinnamon, a dash of vanilla extract, or even a hint of cardamom for a unique twist.
- Handle the Dough with Care: While you aim for an elastic dough, it’s important to avoid over-kneading. Overworking the dough can develop too much gluten, leading to a tough and less tender Chin Chin. Knead just enough until the dough comes together smoothly and is pliable.
- Mastering Oil Temperature: Maintaining a consistent medium heat for your frying oil is paramount. If the oil is too hot, the Chin Chin will brown too quickly on the outside, potentially remaining raw or doughy inside. Conversely, if the oil is too cool, the Chin Chin will absorb excessive oil, becoming greasy and heavy. If possible, use a kitchen thermometer to maintain the ideal temperature, or rely on the small dough piece test for guidance.
Storage and Maximizing Shelf Life:
Once your homemade Chin Chin has cooled completely, transfer it to an airtight container. Stored at room temperature, it will retain its wonderful freshness and satisfying crunch for up to 2-3 weeks. For extended preservation, you can freeze Chin Chin for several months. While the texture might soften slightly upon thawing, a quick toast in a dry pan can often revive some of its crispness.
Versatile Serving Suggestions:
Chin Chin is an incredibly versatile snack that can be enjoyed in numerous ways. Serve it simply on its own as a delightful anytime treat, or pair it with a comforting cup of hot tea, coffee, or even a refreshing cold beverage. It makes a fantastic addition to any snack platter for gatherings, parties, or festive occasions. Its sweet and crunchy profile ensures it’s a crowd-pleaser and a perfect accompaniment to a wide variety of drinks.
Your Chin Chin Preferences: Let’s Connect!
Now that you’re armed with the secrets to crafting truly incredible homemade Chin Chin, I’m eager to hear your thoughts! Which shape do you find yourself drawn to more – the neat, symmetrical squares or the elegant, slender rectangles? Perhaps you’ve ventured into other creative shapes, or have your own unique culinary twist on this beloved classic recipe? Share your Chin Chin experiences, preferences, and any innovative ideas in the comments section below. I love hearing from you!
Enjoy every single, delightful crunch!